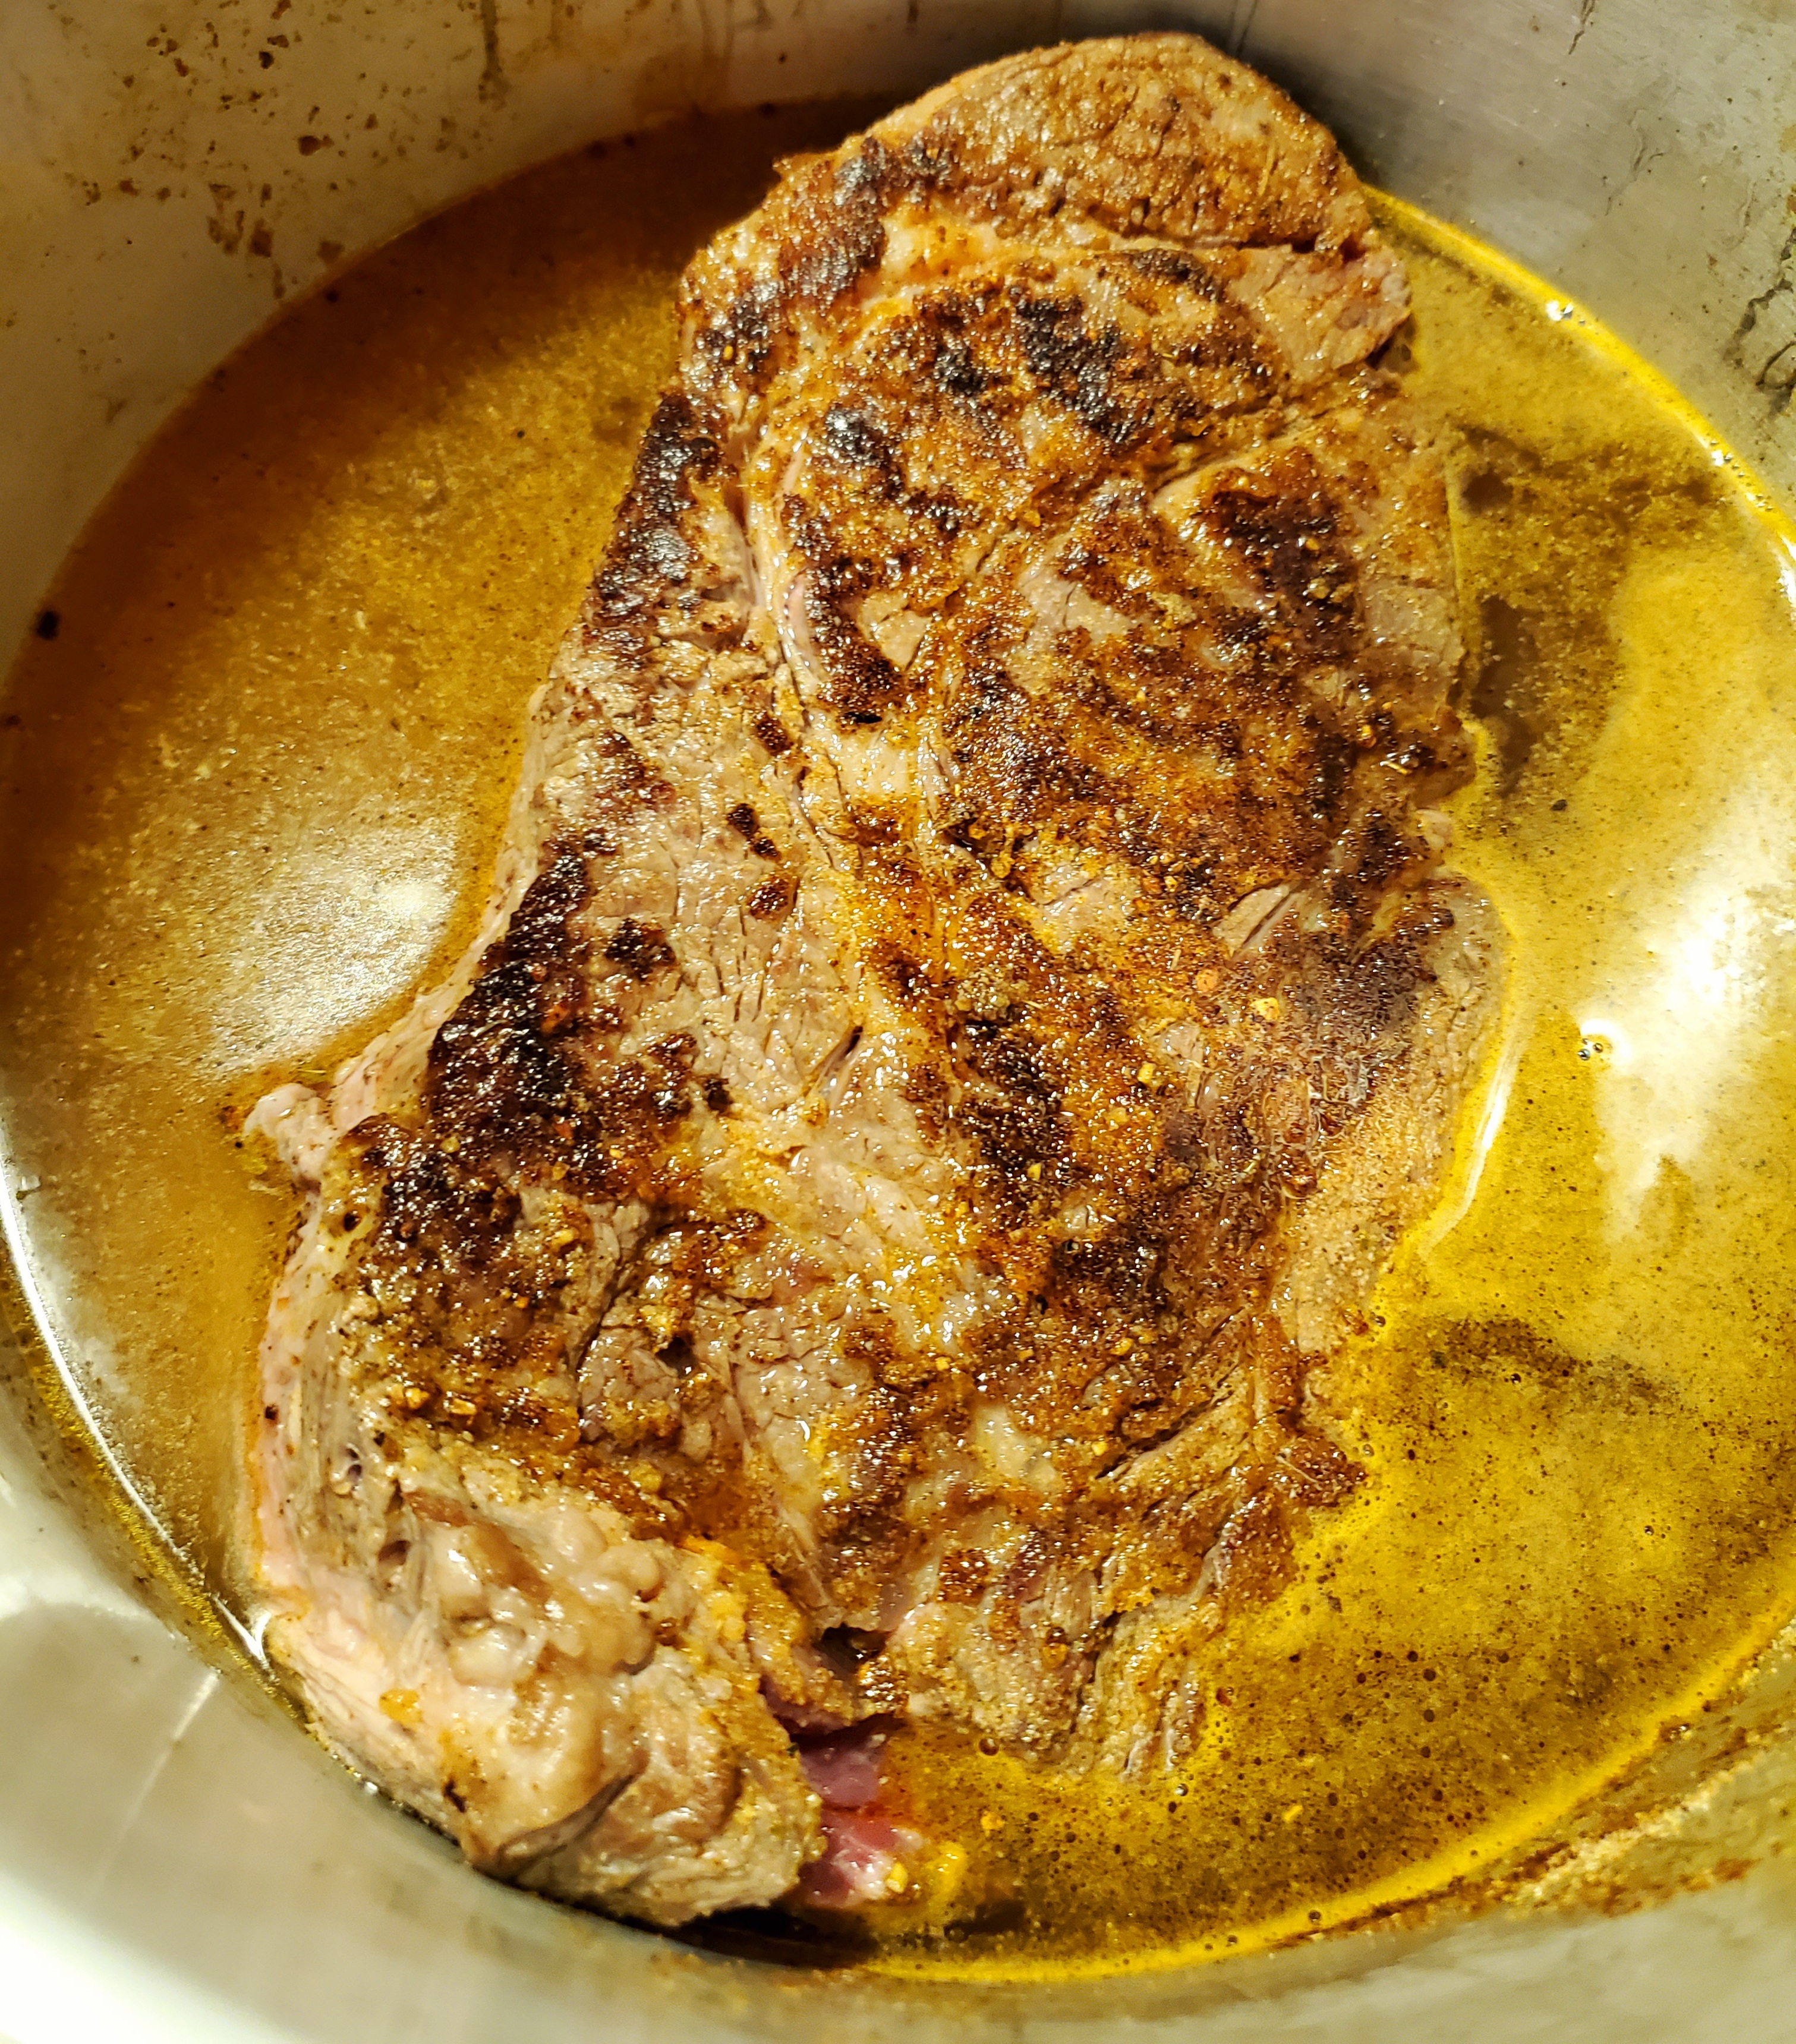
Creamy Potato Soup

Fall is upon us here in Chicago. I love fall for some many reason, but mostly for the food! I love a nice comfort dish, like a delicious bowl of soup, or a stew or chili. Anything I can put in a cute little bowl and enjoy on a crisp fall day.

Potato soup is one of my favorites. It’s usually the first kind I think about when I am craving soup. This potato soup is nothing short of delicious. I use half and half vs. heavy cream to keep it a little lighter. This is finished off with some sour cream which really takes this soup to the next level. You can easily adjust the flavors. Keep in mind all recipes of mine have my taste buds in mind. However, the spices can easily be adjusted.

I need to talk about these adorable soup/chili bowls I got from Amazon. I ordered them and couldn’t wait for them to arrive and couldn’t wait to use them. They are absolutely perfect for soup, chili, pasta, stew, or anything that need to go in a bowl. Check out my Amazon favorites https://www.amazon.com/shop/garlic_and_oliveoil_veins for the bowls. They are fairly inexpensive and they are oven, microwave and dishwasher save! I can’t wait to use them over and over!!

So, check out this delicious recipe!

Creamy Potato Soup

Ingredients:
4 T butter
2 T olive oil
1 1/2 cups celery, diced (about 4 stalks)
2 cups onion, diced (2 medium onions)
4 cups russet potatoes, diced
4 garlic cloves, minced
2 -32 oz chicken stock
1 cup half and half (or heavy cream)
1/4 cup light sour cream
8 oz shredded cheese ( I used cheddar jack)
2 T grated Romano cheese
6 slices cooked bacon, chopped
3 T flour
2 t thyme
2 t rosemary
1 t crushed red pepper flakes
2 t garlic powder
2 t onion powder
2 t salt
2 t pepper

Toppings:
cheese
chopped bacon
green onions

Directions: Heat a large stockpot/ soup pot on high heat. Add in the olive oil and let heat 2 minutes. Add in the celery, onions and garlic, cook till tender and fragrant. Season with a pinch of salt and pepper. Add in the butter and let melt. Sprinkle the onion mixture with the flour and mix well. Let the flour cook about 3 minutes.

Next add in the chicken broth and mix well. Add in the potatoes and half of the thyme and rosemary. Reduce heat to medium and cover. Simmer 30 minutes until the potatoes are tender. After the 30 minutes make sure the potatoes are fork tender.

Remove pot from the stove and use an immersion blender to break up the potatoes. If you want to keep the soup a little heartier you can keep some of the potato pieces whole. I prefer a smoother finish so I make sure all the potatoes are pulsed.

Next add in the shredded cheese and half and half and mix well. Make sure that the cheese is fully melted. Season the soup with the garlic and onion powder, the rest of the thyme and rosemary, the crushed red pepper and salt and pepper. Taste and adjust seasoning as needed. Add in the chopped bacon. Let simmer on low for 10 minutes mixing a few times .

To finish the soup, add in the sour cream and Romano cheese and mix till it’s fully melted. To serve using a ladle add into a soup bowl and top with shredded cheese, chopped bacon and green onions. Enjoy!

Notes: You can adjust this to make it vegetarian. Use veggie broth and remove the bacon! It will still be delicious. I use low sodium chicken broth in this as well. Keep in mind with doing that you will need to make sure the soup is seasoned enough with salt. I prefer to add my own salt vs getting all the salt from the broth, therefore I can control the salt level.

Instant Pot Shredded Beef

I love making shredded beef for tacos or burritos. It’s simple to make and comes out so tender in a pressure cooker. I personally use a pressure cooker vs an Instant Pot. However, this recipe will reflect the Instant Pot!

This beef is even great just on it’s own, in a salad, in a taco, burrito or even in a wrap. It freezes wonderfully as well! Give it a try!

Instant Pot Shredded Beef

Ingredients:
3-4 lb chuck roast, excess fat trimmed
2 T olive oil
3 C beef broth (or water)
2 t onion powder
2 t garlic powder
2 t cumin
2 t chili powder
2 t paprika
2 t salt
2 t pepper
1 medium onion, quartered (optional)

Direction: Mix all above seasonings into a bowl. Fully season the beef roast on both sides. Turn the pressure cooker to saute. Add in 2 T of olive oil. Make sure the the pressure cooker is ready.

Sear the roast on all sides about 3-4 minutes. You are looking for a nice brown exterior. Once browned, add in the beef broth and onion (if using.) This will cook for 60-70 minutes, depending on the size. Let the pressure release naturally.

Once pressure is released, remove roast and put on a large cutting board or large bowl and shredded using 2 forks. I skim the fat off the top of the liquid inside the pot and add the juices to the meat. This give is a nice rich flavor.

This meat can be served up with potatoes or noodles, your favorite veggie side or a salad. Or tacos & burritos!

Crispy Skin Chicken Thighs

One of the main proteins I get asked about is chicken. It seems like the world can never get enough chicken recipes! This one is beyond simple to make! It’s just some seasoned up chicken thighs, baked in the oven and the chicken comes out crispy and juicy. Here ya go!

Crispy Skin Chicken Thighs

Ingredients:
8 chicken thighs, bone in, skin on
2 t garlic powder
2 t onion powder
2 t oregano
2 t parsley
2 t paprika
2 t chili powder
2 t salt
2 t pepper

Direction: Preheat oven to 400°. Place the chicken in an oven safe baking dish or a rimmed baking sheet. Pap the chicken thighs dry with a paper towel. (This will help the skin get nice and crispy.) In a small bowl mix together all of the above spices. Evenly season the chicken thighs with the seasoning blend. Place in the oven 45-55 minutes. Chicken is cooked when juices run clear and the internal temperature reaches 165°.

Note: The cook time depends on size of the thighs. If you are using boneless you would need to reduce the cooking time. See my Favorite Amazon item link at the top of the page for my internal thermometer.

Chicken Gyros with Tzatziki Sauce

This chicken recipe is a super healthy take on a gyro. It’s made with marinated chicken with Greek yogurt and herbs. The good thing about this is you can put anything else you’d like in the pita. Below I gave a few options. This particular one I made I put feta cheese, onion, tomato and kalamata olives. Yum! This comes out really delicious. It’s super simple to make and great for left overs. This chicken is great even on a salad. The marinade really makes it!

Chicken Gyros with Tzatziki Sauce

Ingredients:

Chicken:
6 chicken breasts, diced
2 T olive oil
1 cup plain Greek yogurt
1/2 lemon juice and zest
3 garlic cloves, grated
2 t salt
2 t pepper
1 t dill
2 t oregano
1 t parsley

Directions: In a medium mixing bowl add the above ingredients except the chicken. Mix well to incorporate. Next add in the diced chicken and mix to make sure all the chicken is coated. Cover and place in the refrigerator to marinate for at least 1 hour and up to 24 hours.

Tzatziki Sauce
1 1/2 cups cucumbers, grated
1 1/2 cup plain Greek yogurt
3 T extra virgin Olive Oil
1 T dried dill, (2 T fresh)
1 T lemon juice
2 garlic cloves, grated
1 t salt

Directions: Once cucumbers are grated wrap in a towel and squeeze out the excess liquid. Do this until most of the excess moisture seems to be removed. Add to a bowl. Add in all the above ingredients. Mix well. Place in the refrigerator to let the flavors marry. Taste and adjust seasoning as needed. Save for later.

Gyro Extras:
Pita bread
Onions
Tomato
Kalamata Olives
Feta Cheese
Cucumbers
Lettuce
Peppers

Directions: Heat a large non stick skillet on medium high heat. Once heated, add in the chicken. Make sure the chicken is completely flat and not overlapping. Turn the pan up to high. Let the chicken cook 3-4 minutes and then mix and let cook another 3-4 minutes. In order to get the nice coloring of the chicken you may need to drain any excess liquid. Sometimes the marinade produces to much liquid. If that happens, just drain out the liquid and that will help the chicken brown and get crispy.

To assemble the gyro warm the pita slightly. You can either warm in the oven in foil or the microwave wrapped in paper towel. Add the tzatziki sauce to the pita and top with a few spoonful of chicken. Next top with your favorite toppings. I personally like onion, you can use white or red, tomatoes and some kalamata olives, add some crumbled feta and enjoy!

Note: This chicken is great frozen. You can freeze any extra for another meal. Use any toppings you like to make the gyro delicious to you.

Simple Ground Beef Taco Salad

It’s no secret how much I love tacos.  I could eat them every single day!  I like to change it up with a quick taco salad every once in a while.  There is a lot of veggies and nutrients in a taco salad.  You can literally put any salad item you like into this.

This one I make is fairly traditional and simple. Take a look!

Simple Ground Beef Taco Salad

Servings: 2 Taco Salads

Ingredients:
12 oz lean ground beef
2 T taco seasoning (reduce sodium)
1/2 cup-3/4 corn, cooked
1/2 cup-3/4 black beans, drained
1/2 cup tomatoes, diced
1/2 cup red onion, diced
1 avocado, diced
1/2 cup, shredded cheddar cheese
8 cups lettuce, chopped
4 T cilantro, chopped

Sour cream:
1/2 Cup lite sour cream
1 lime, juiced
1/2 T extra virgin olive oil
2 t chili powder
1 t cayenne pepper
1 t garlic powder
1 t onion powder
1 t salt
1 t pepper

Directions:  In a medium bowl add in the sour cream, olive oil and lime juice and mix well.  Season the sour cream with seasonings above. Stir and set aside.

In a medium saute pan add in the ground beef, break up the meat as it’s cooking.  Season with the taco seasoning and completely brown the meat and cook through. (Note: If you aren’t using a lean beef, you may want to drain the fat prior to adding the taco seasoning, or drain on paper towel once cooked.)

For the corn and black beans you can put in  the salad warm, room temp or cold.  It’s really a preference.  Personally I warm the corn and black beans up slightly.

To assemble the taco salad, add 1/2 chopped lettuce to a bowl (4 cups), then top about 5-6 oz of ground beef, right in the middle.  Next add the rest of the toppings, black beans, corn, red onion, tomatoes, cheese, avocado and cilantro.

Top with a few dollops of your sour cream and serve!  I like to mix mine up so I get a little of everything with each bite.

Note: My taco bowl shown doesn’t have cilantro as I was out of it! I put in the recipe because I love it and I think everything Mexican food related should have it! 🙂 Also, you can easily substitute your favorite protein. Or add more beans for a vegetarian option.  There is no rules!

20200727_080210.jpg

Cheesy Mexican Cauliflower Rice

Over the last 2 years I’ve really gotten into cauliflower rice.  Cauliflower rice has become such a popular side dish, especially with those who follow low carb and keto eating plans.  I enjoy it because it’s an easy way to get more veggies into my meals.

This recipe is beyond simple.  I will be honest, I prefer cauliflower that’s already riced.  I loath cutting or grating cauliflower rice.  LOL.  Yes, I know that’s a strong word, but I really don’t like it at all.  I prefer to just buy it already riced, fresh or even frozen.  The organic frozen rice I get from Trader Joe’s is by far my favorite. The pieces are nice and small and it cooks very well.  If you want to be a warrior and use fresh cauliflower go for it! Regardless this recipe is delish and simple.

Mexican Cauliflower “Rice”

Ingredients:
12 oz, frozen cauliflower rice
2 T Butter
¾ cup shredded cheese (I used Mexican mix)
¼ cup chunky salsa
2 garlic cloves, minced
1 small onion, diced
2 t low sodium taco seasoning (more to taste)
½ t garlic powder
½ t onion powder
½ lime, juiced
½ T olive oil
2 T chopped fresh cilantro
Sprinkle salt and pepper

Directions: Cook cauliflower rice in the microwave according to package but reduce the cook time by 2 minutes.  Heat a medium sauté pan on high heat.  Add oil and let heat a minute before adding in the onion and garlic.  Sauté the onion and garlic for 3 minutes. Add in the cauliflower rice, butter and taco season, garlic and onion powder.  Add the salsa and lime juice and stir.  Let cook covered 4-5 minutes.  Add the shredded cheese and mix until fully melted, season with salt and pepper and sprinkle in cilantro and serve immediately.

Note: You can also cook the cauliflower in a pan first vs in the microwave. I like doing in the microwave as I feel like it produces less water.  If there is water you can just drain in prior to adding to the sauté pan.

20200518_222406.jpg